| ATTENTION - Vacation Closure | We will be closed from March 14th to March 23rd, 2026 Orders can still be placed online but wont be fulfilled until we get back |


We’ve gathered all the info here on how we work, and how best to work with us. This should answer most questions but if you find it doesn’t, please call or email us.
What does Giclee mean?
Here at Craft Giclee, the word Giclee means an archival, digital fine art print. It means that we know the color longevity of each paper or canvas. Our digital fine art prints are made to last as long, if not longer, than most traditional photographic processes. We are focused on a quality end product, without compromise.
Giclée (/ʒiːˈkleɪ/ zhee-KLAY) is a neologism, ultimately derived from the French word gicleur, coined in 1991 by printmaker Jack Duganne for fine art digital prints made using inkjet printers.[1] The name was originally applied to fine art prints created on a modified Iris printer in a process invented in the late 1980s. It has since been used widely to mean any fine-art printing, usually archival, printed by inkjet. It is often used by artists, galleries, and print shops for their high quality printing, but is also used generically for art printing of any quality. - Wikipedia
Available Services Grid
| Retail | Resale - Taxable | Resale - Tax Exempt | |
|---|---|---|---|
| Quantity Discount | Standard | Standard | Standard |
| Resale Discount | Not Available | 2.5% | 5% |
| Additional Shipping Options | No | Yes | Yes |
| More Payment Options | No | Yes | Yes |
| Approval Required | No | Yes | Yes |
| Tax Exempt | No | No | Yes |
| Quantity | Discount |
|---|---|
| 3 to 4 Prints | 10% Off |
| 5 to 6 Prints | 15% Off |
| 7 to 9 Prints | 17.5% Off |
| 10 to 14 Prints | 20% Off |
| 15 to 19 Prints | 22.5% Off |
| 20 to 24 Prints | 25% Off |
| 25 to 49 Prints | 30% Off |
| 50 to 99 Prints | 35% Off |
| 100 to 199 Prints | 42.5% Off |
| 200+ Prints | 47.5% Off |
Giclee Single Print Pricing Tables
Custom size print pricing can be found be going to your favorite substrate and entering all the option details.
Gallery Wrapped Canvas Pricing - 5/8" Stretcher Bars
| 8 x 10 | 16 x 20 | 24 x 36 | 30 x 40 | 40 x 60 | |
| Fredrix Crystal Matte Canvas | 51.26 | 91.14 | 173.02 | 218.94 | 358.55 |
| Hahnemühle Metallic Canvas | 61.52 | 109.36 | 207.62 | 262.73 | 430.62 |
| Hahnemühle Photo Canvas | 51.26 | 91.14 | 173.02 | 218.94 | 358.55 |
Gallery Wrapped Canvas Pricing - 3/4" Stretcher Bars
| 8 x 10 | 16 x 20 | 24 x 36 | 30 x 40 | 40 x 60 | |
| Fredrix Crystal Matte Canvas | 55.87 | 99.83 | 188.57 | 238.62 | 391.10 |
| Hahnemühle Metallic Canvas | 67.05 | 119.19 | 226.28 | 286.34 | 469.32 |
| Hahnemühle Photo Canvas | 55.87 | 99.83 | 188.57 | 238.62 | 391.10 |
Gallery Wrapped Canvas Pricing - 1 1/2" Stretcher Bars
| 8 x 10 | 16 x 20 | 24 x 36 | 30 x 40 | 40 x 60 | |
| Fredrix Crystal Matte Canvas | 57.60 | 102.40 | 194.40 | 246.00 | 403.20 |
| Hahnemühle Metallic Canvas | 69.12 | 122.88 | 233.28 | 295.20 | 483.84 |
| Hahnemühle Photo Canvas | 57.60 | 102.40 | 194.40 | 246.00 | 403.20 |
Gallery Wrapped Canvas Pricing - 2" Stretcher Bars
| 8 x 10 | 16 x 20 | 24 x 36 | 30 x 40 | 40 x 60 | |
| Fredrix Crystal Matte Canvas | 66.82 | 118.78 | 225.50 | 285.36 | 246.71 |
| Hahnemühle Metallic Canvas | 81.56 | 145.00 | 275.27 | 348.34 | 570.93 |
| Hahnemühle Photo Canvas | 66.82 | 118.78 | 225.50 | 285.36 | 246.71 |
Rolled Canvas Pricing - does not include extra canvas for stretching
| 8 x 10 | 16 x 20 | 24 x 36 | 30 x 40 | 40 x 60 | |
| Fredrix Crystal Matte Canvas | 24.00 | 58.88 | 101.09 | 135.60 | 216.00 |
| Hahnemühle Metallic Canvas | 28.80 | 70.66 | 121.31 | 162.72 | 259.20 |
| Hahnemühle Photo Canvas | 24.00 | 58.88 | 101.09 | 135.60 | 216.00 |
Hahnemühle Paper Pricing
| 8 x 10 | 16 x 20 | 24 x 36 | 30 x 40 | 40 x 60 | |
| Albrecht Dürer | 12.40 | 35.20 | 67.39 | 90.00 | 170.40 |
| Bamboo | 12.40 | 35.20 | 67.39 | 90.00 | 170.40 |
| FineArt Baryta | 16.40 | 42.24 | 90.72 | 112.80 | 220.80 |
| FineArt Pearl | 16.40 | 42.24 | 90.72 | 112.80 | 220.80 |
| German Etching | 19.19 | 49.42 | 106.14 | 131.98 | 258.34 |
| Museum Etching | 19.19 | 49.42 | 106.14 | 131.98 | 258.34 |
| Photo Glossy | 12.40 | 35.20 | 67.39 | 90.00 | 170.40 |
| Photo Rag 308 | 16.40 | 42.24 | 90.72 | 112.80 | 220.80 |
| Photo Rag Baryta | 16.40 | 42.24 | 90.72 | 112.80 | 220.80 |
| Photo Rag Pearl | 16.40 | 42.24 | 90.72 | 112.80 | 220.80 |
| Photo Rag Satin | 16.40 | 42.24 | 90.72 | 112.80 | 220.80 |
| Photo Rag Ultra-Smooth | 16.40 | 42.24 | 90.72 | 112.80 | 220.80 |
| Torchon | 12.40 | 35.20 | 67.39 | 90.00 | 170.40 |
| William Turner | 19.19 | 49.42 | 106.14 | 131.98 | 258.34 |
Breathing Color Paper Pricing
| 8 x 10 | 16 x 20 | 24 x 36 | 30 x 40 | 40 x 60 | |
| Signa Smooth | 11.20 | 27.84 | 53.57 | 67.20 | 129.60 |
| Vibrance Luster | 11.20 | 27.84 | 53.57 | 67.20 | 129.60 |
Canson Infinity Paper Pricing
| 8 x 10 | 16 x 20 | 24 x 36 | 30 x 40 | 40 x 60 | |
| Arches Aquarelle | 16.40 | 42.24 | 90.72 | 112.80 | 220.80 |
Moab Slickrock Paper Pricing
| 8 x 10 | 16 x 20 | 24 x 36 | 30 x 40 | 40 x 60 | |
| Metallic Pearl | 12.40 | 35.20 | 67.39 | 90.00 | 170.40 |
| Metallic Silver | 12.40 | 35.20 | 67.39 | 90.00 | 170.40 |
Epson Paper Pricing
| 8 x 10 | 16 x 20 | 24 x 36 | 30 x 40 | 40 x 60 | |
| Cold Press Bright White | 12.40 | 35.20 | 67.39 | 90.00 | 170.40 |
Standard Print & Picture Frame Proportions
This chart shows various sizes that fit into the same aspect ratio. For example, if you wanted to resize an 8 x 10 to another standard picture frame size, you can see that an 8 x 10 fits into a 16 x 20 size without having to crop.
| Aspect Ratio | |||||||||
| 1:1 | 5x5 | 8x8 | 20x20 | 30x30 | 48x48 | 60x60 | |||
| 2:3 | 4x6 | 6x9 | 8x12 | 12x18 | 16x24 | 20x30 | 24x36 | 40x60 | |
| 3:4 | 3x4 | 6x8 | 9x12 | 12x16 | 18x24 | 30x40 | 36x48 | ||
| 4:5 | 4x5 | 8x10 | 16x20 | 24x30 | 28x35 | 48x60 | 60x75 | ||
| 5:6 | 10x12 | 20x24 | |||||||
| 5:7 | 2x3.5 | 3.5x5 | 5x7 | 10x14 | 15x21 | 20x28 | |||
| 11:14 | 11x14 | 22x28 |
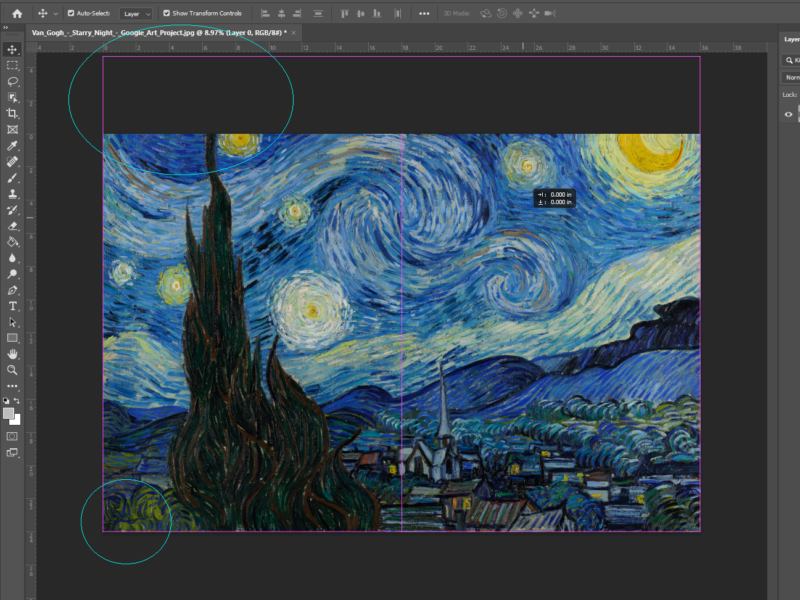
Let’s learn how to Crop and Resize files with Photoshop!
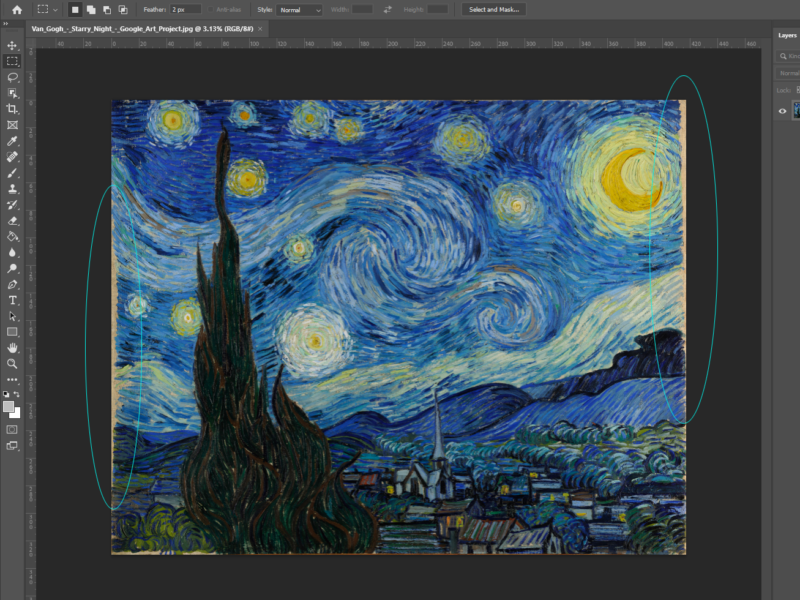
Vincent is looking to have a Giclee made of one of his pieces. The first step after getting the art digitized is getting it print ready. As you can see, there are a couple areas where we need to crop his painting to clean up the sides. Vincent wants to make sure the final print looks its best.
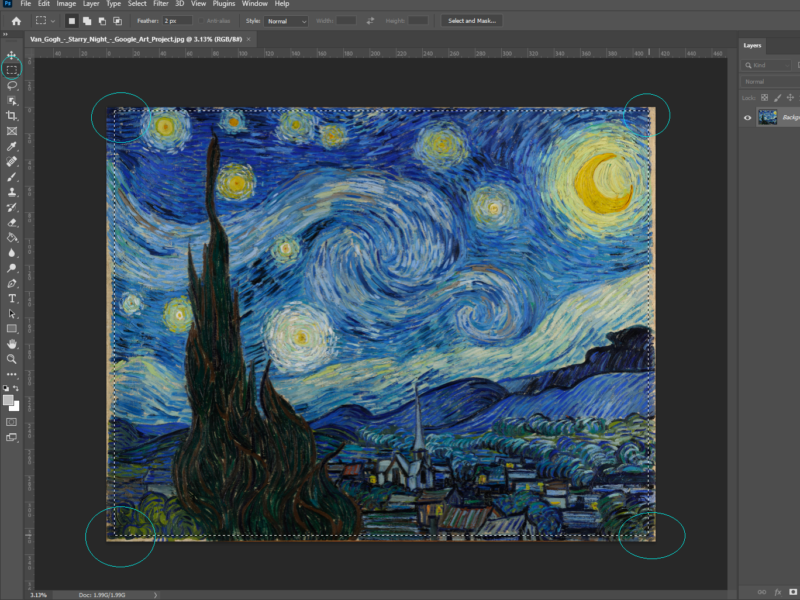
Select the Rectangular Marquee tool, then click and drag where you want to crop the image. You can see in the four corners we came in the image a little bit to cut off or "crop" the image to clean up the edges.

Go into the Image section in the upper left and then select Crop.
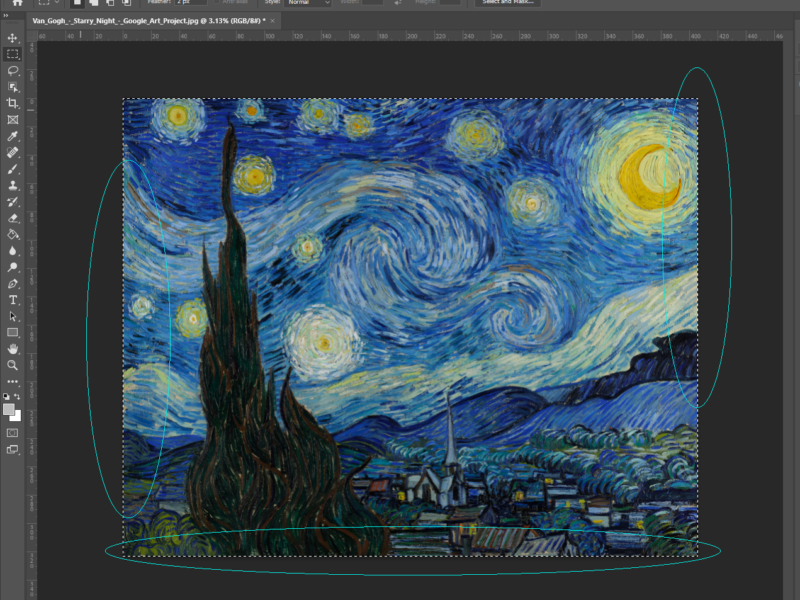
Here you can see we have nice clean edges now.

Now we're ready to look at and then adjust the size and resolution. Go into the Image Menu again and select Image Size.

The image is really big, but at a low resolution. We need to change these numbers to make the file print at the correct size and resolution.

Vincent wants his finished print to be 36 inches wide. The height we'll let go to what ever it needs to. You can see we also left the Constrain Proportions selected. It's the little chain symbol to the left of the sizes. We also change the Resolution to 300 pixels per inch - that's the same as 300dpi.
We now have the correct size and resolution to make Vincent's print. You can now save the file as a TIFF or PNG file. Go to the File menu and select Save As so you don't overwrite your original file.
If you're trying to fit your image in a particular size, i.e. a standard picture frame size like a 16 x 20, etc, read on!

Well, now Vincent has decided he actually wants the print to fit in a standard sized picture frame so the friend he's giving his print to can buy a ready-made frame. Vincent has decided he's going to make his friend Paul's print a 24 x 36 standard poster frame size.
Before we get to the size for Paul's print, we need to make sure one item is turned off in Photoshop. Click on the little lock symbol in the layer with the image we're printing. This will unlock the layer so we can freely move it around during the next step.

Go into the Image menu again and select Canvas Size.

The Canvas Size options box will open. Input the correct height and width you want to make you print. In this case we're making Vincent's friend's print the 24 x 36 we already discussed. Click OK.
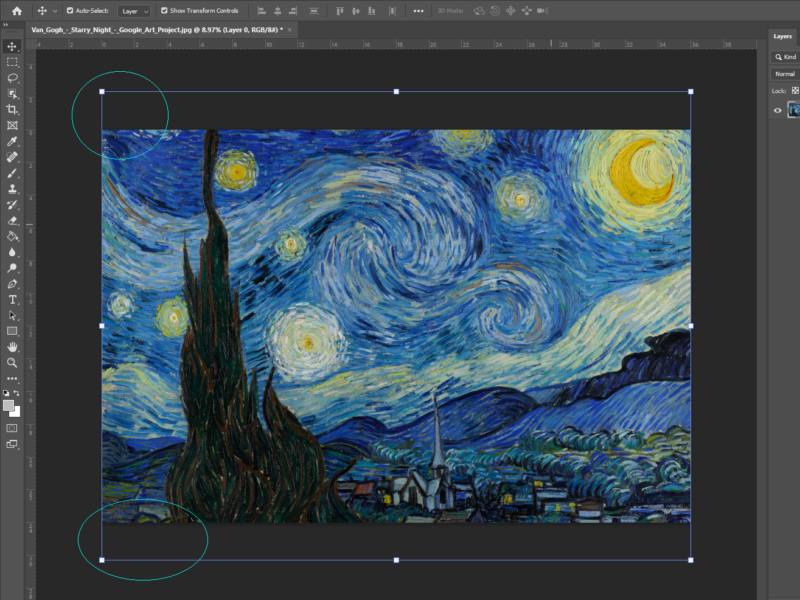
You now have a perfectly sized 36 inch wide by 24 inch tall box. You can see where the image at the top and bottom is now covered. And you can still see where the rest of the image is if you have the Transform Controls selected.
Drag the image around and resize it using the Transform Controls until you like the crop. Once you’re happy with the placement, go ahead and save it in one of the preferred file types.
Here at Craft Giclee we really didn't like the crop of Vincent's painting. He insisted, and we didn't want to press the situation, but we'd likely try to talk you out of something like that and into a different format, or let the size be what it is. We can print totally custom sizes!
Three Paper Proofs
$
25-27.50
Three Proofs + 1/2 Hour Editing
Three (3) color proofs printed on the paper of your choice.
Three edited versions of your print, shipped to you. We use our best judgement when color editing, but also ask you to give us direction on what colors and areas are important to you.
After your proofs arrive, log in to your account and approve your choice.
You're now ready to place your print order using the Title of the file you just approved. USE EXACT FILE NAME.
Three Canvas Proofs
$
30-32.50
Three Proofs + 1/2 Hour Editing
Three (3) color proofs printed on canvas, hand sprayed with your choice of UV Coating.
Three edited versions of your print, shipped to you. We use our best judgement when color editing, but also ask you to give us direction on what colors and areas are important to you.
After your proofs arrive, log in to your account and approve your choice.
You're now ready to place your print order using the Title of the file you just approved. USE EXACT FILE NAME.
Local Appointment
$
100
Per Hour
Unlimited color proofs on professional proofing paper or canvas.
If you're interested in proofing locally, please contact us to setup an appointment.
We charge by the hour: half an hour to start, 15 minute increments after that.
Please call (480) 663-3313 with any questions.
Retail Account - Rolled Canvas & Paper Print Shipping Costs
| Cart Total | Shipping Costs |
| Up To $35.00 | $3.95 |
| Up To $50.00 | $7.95 |
| Up To $100.00 | $14.95 |
| Up To $200.00 | $19.95 |
| Up To $400.00 | $24.95 |
| Up To $500.00 | $49.95 |
| Over $500.00 | Custom Quote Provided |
Retail Account - Gallery Wrap Shipping Costs
| Cart Total | Shipping Costs | Additional Costs |
| Up To $30.00 | $9.95 | |
| Up To $50.00 | $17.95 | |
| Up To $100.00 | $24.95 | |
| Up To $200.00 | $29.95 | +5% of Total |
| Up To $400.00 | $49.95 | +5% of Total |
| Up To $500.00 | $74.95 | +7.5% of Total |
| Over $500.00 | Custom Quote Provided |